Rotary Encoders with the Arduino
May 8, 2012
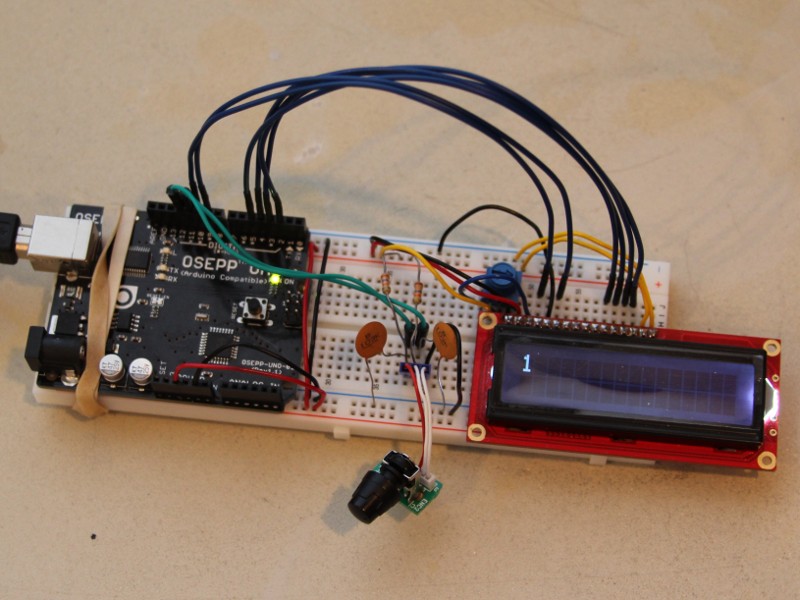
Rotary encoders are used to measure rotation. Unlike a potentiometer, they can be rotated infinitely in either direction and measure rotation in discrete steps. The scroll wheel of a mouse and volume knob of a car stereo are examples of encoders found in consumer goods. I pulled a small one out of a radio and setup an Arduino to read it and increment or decrement a variable accordingly. For this simple test I displayed the value on an LCD.
How it works:
The encoder has three pins: A, B and C. The C pin goes to ground while A and B are pulled high through current-limiting resistors. Those two pins output square waves that provide useful information. Clockwise rotations result in the A waveform leading the B waveform. Counter-clockwise rotations result in the B waveform leading the A waveform.
The encoder I used has detents. When the shaft is at rest the A and B pins will have the same voltage (both high or both low.) Each click of rotation results in both pins changing polarity, but with a slight time offset. The logic to interpet the square waves can be summarized as follows:
Clockwise = pins going from low/low to high/low and ending up high/high.
Clockwise = pins going from high/high to low/high and ending up low/low.
Counter-clockwise = pins going from low/low to low/high and ending up high/high.
Counter-clockwise = pins going from high/high to high/low and end up low/low.
Since the low-cost rotary encoders in consumer goods typically use mechanical switches (which short A and/or B to C to produce the square waves) you have to deal with switch bounce -- the metal contacts bounce a little when making or breaking contact. I noticed about 30-60us of switch bounce with my particular encoder:
Capacitors can be used to buffer the change in voltage, which effectively masks the problem. Small caps in the nF range are commonly used. Too small and they won't be effective, too large and you can't interpret fast rotations. Recall the RC time constant: t = RC. The time it takes (in seconds) for a capacitor to charge to ~63% or discharge to ~37% through a resistor equals the resistance (in Ohms) multiplied by the capacitance (in Farads.) I had some 27K resistors and 10nF caps laying around, so the time constant for my circuit is approximately 270us. That's more than enough to compensate for the 30-60us of switch bounce without limiting accurate readings of quick rotations. In this circuit the resistors should be at least 1K to minimize current flow, and caps should be chosen so the time constant is less than 1ms.
Here's the final schematic and code:
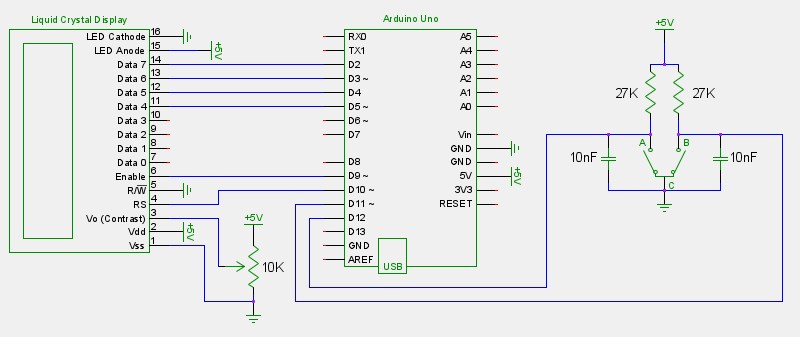
#include <LiquidCrystal.h>

LiquidCrystal lcd(10, 9, 5, 4, 3, 2); // RS, Enable, D4, D5, D6, D7
int count = 0;
byte currentA, currentB, previousA, previousB = 0;

void setup() {
  lcd.begin(16, 2);
  previousA = currentA = digitalRead(12);
  previousB = currentB = digitalRead(11);
}

void loop() {
  previousA = currentA;
  previousB = currentB;
  currentA = digitalRead(12);
  currentB = digitalRead(11);

  if(previousA == LOW && previousB == LOW && currentA == HIGH && currentB == LOW) // clockwise
    count++;
  else if(previousA == HIGH && previousB == HIGH && currentA == LOW && currentB == HIGH) // clockwise
    count++;
  else if(previousA == LOW && previousB == LOW && currentA == LOW && currentB == HIGH) // counter-clockwise
    count--;
  else if(previousA == HIGH && previousB == HIGH && currentA == HIGH && currentB == LOW) // counter-clockwise
    count--;

  lcd.setCursor(0, 0);
  lcd.print(count);
  lcd.print("   ");
}